Every cool designer always has an online portfolio available on the internet. Today it doesn’t even come into question anymore. Of course you need one. But how can you do that quickly?
Creating a portfolio website might look like a tedious job, something that takes weeks. First find a hosting provider and draw your portfolio in a design tool. Only then have you reached the stage to code…
Wait, what? You wanna code it? Or just a WordPress template? Huh, I already see the days you will spend installing and uninstalling plugins, adjusting CSS and that nightmare with the hosting provider’s admin panel.
If you want a great portfolio, you should focus on its content, not the code (unless you work as a frontend developer). But I have some good news. In this tutorial, I share how to build an awesome online design portfolio step-by-step.
We’ll create your online portfolio from zero, without writing a single line of code. Your portfolio will have a stunning look and it will present compelling stories about your design projects. I’ll also show you some great examples to inspire you.
So, ready to start?
Online design portfolio examples with great cover pages
People will see the homepage of your online portfolio first. This front page should grab their attention and make visitors click on your work to read more. Maybe it will make them call/email you instantly.
Before I tell you how to create an awesome front page, let’s look at some great examples from other designers.
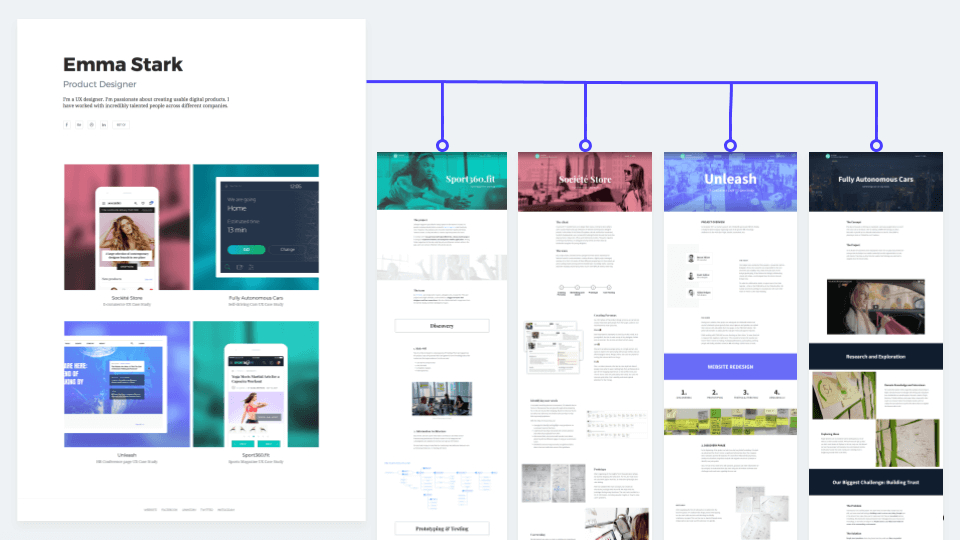
Eric Zirlinger has made his portfolio one of my favorites. He designed the top of the page clean and clear with his name in a great font, a short bio and some contact links. Simple but awesome.
Below the header we see four big images of four projects to click on. Both images cover a decent, detailed case study if you want the details. Eric creates a unique mood with the colors of these cover images.
He aligned everything on the left, but nowadays I see many portfolios aligned to the center as well. The example below also shows some menu points on the top. Besides the work displayed on the front page, it also has an “About me” page to open.
Marcela Díaz uses a similar structure, but she displays a huge smiling photo of herself on the top. It makes for a great move if you want to get more personal. With this design, people can imagine the person behind the design. I think this design works so well for Marcela, but other designers might choose to skip their photos – also OK. To each their own.
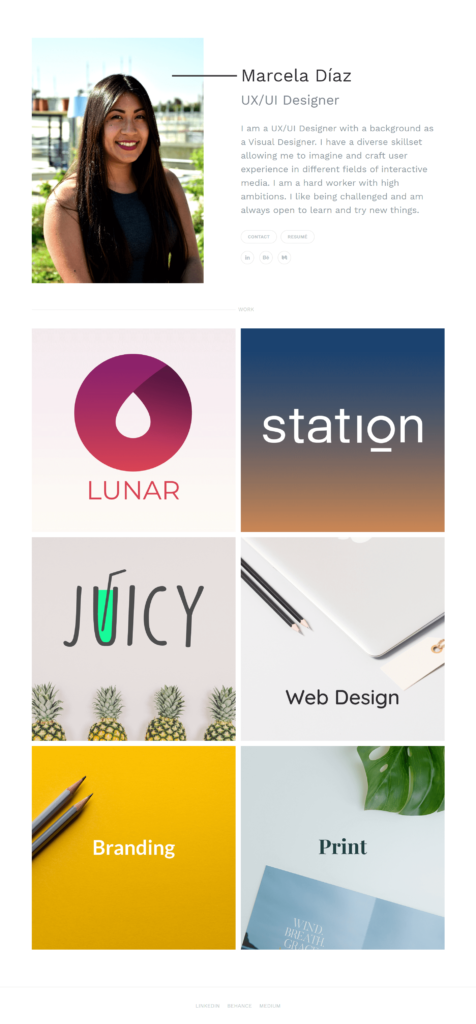
Marcela doesn’t showcase projects in her portfolio. Instead, she collected her work in categories like print, web or branding. Usually I don’t recommend this structure. When you apply for a job, determine the design job’s type and apply with a portfolio tailored to the position. If you apply for a UX job, submit a UX portfolio with only UX projects. That doesn’t mean you can’t include a branding portfolio as well.
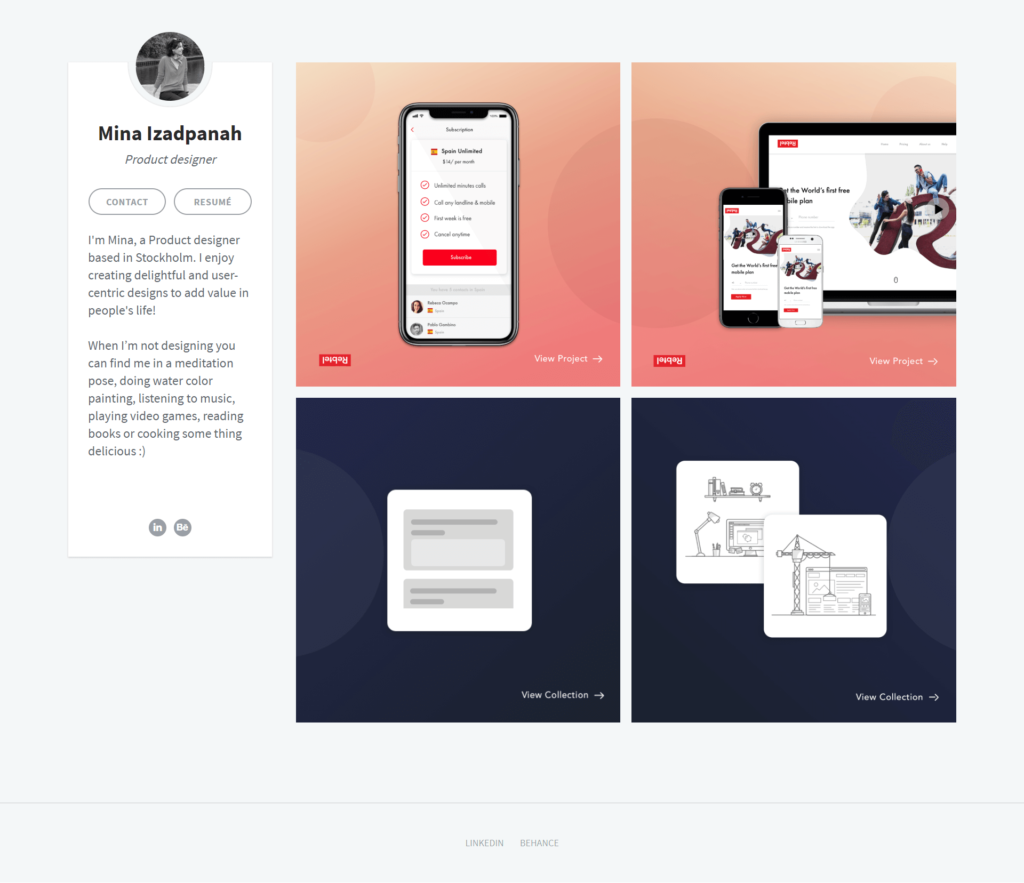
I like Mina Isadpanah’s portfolio front page because it puts her work in the focus. She has a photo, short bio and contact details on the left sidebar, but her projects use up most of the space on the front page. From these big images of different screens she designed, you can easily see what great design skills she has.
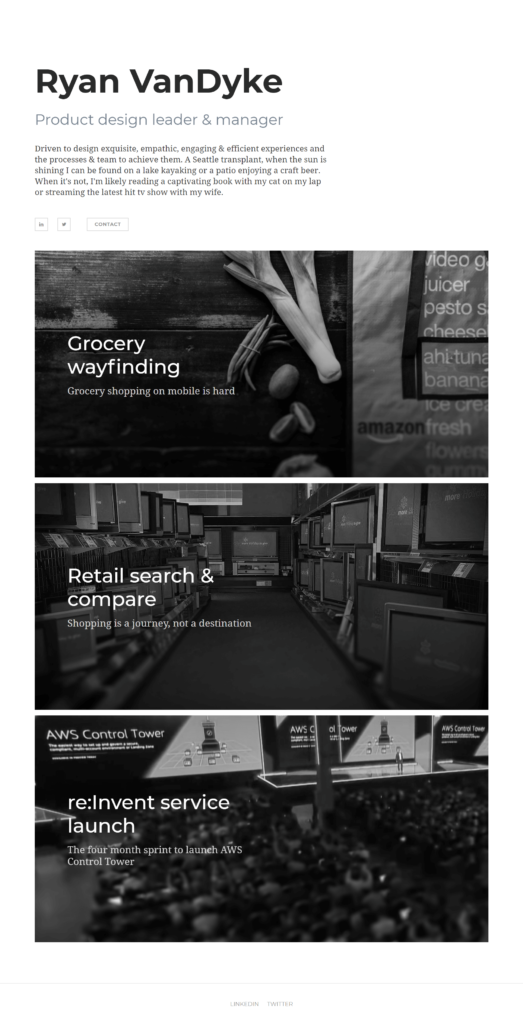
Finally, I would like to share Ryan VanDyke’s portfolio. He uses wide images for his projects, and the whole thing has a cool, dark atmosphere. He makes quite a brave move, using this monochrome design, but it sets the portfolio apart as unique.
Now that we have seen a few great front pages from different online portfolios, we can easily collect the main attributes of the best home pages:
- The designer’s name on top with an optional photo
- A short bio
- Contact information and social links (without them people can’t reach you!)
- Big beautiful images of your work
The images will set the tone, create a great atmosphere and provide a positive first impression. Plus, on clicking them, people can see the details of your work in the form of a great case study.
Disclaimer: All these designers made their portfolios with the same tool, one we built: uxfol.io. In this tutorial I will teach you how to build a portfolio like these with a step-by-step guide.
Before we dig deeper into the tutorial, I would like to highlight the single most important part of all online design portfolios. I already mentioned it in the previous list: case studies.
Today an attractive portfolio cover page doesn’t cut it anymore. Design leaders want to see how you did your designs; you can’t just dazzle them with a few fancy images. Especially in UX, but people in other fields like architecture, graphic design and branding are catching up pretty fast as well.
I speak from experience, having evaluated thousands of UX designer portfolios and taken part in hundreds of interviews in my UX agency. Many of the world’s most famous designers from companies like Google and InVision have told us this. Read our interviews with them on this blog.
So besides a stunning cover page, you’ll need a few great case study pages. There you tell the story of your design so your future employer understands your thoughts and ideas better.
Let’s see a few great case study examples from other designers.
Great design case studies from online design portfolios
Here come a few great design stories from online portfolios. Usually they have a dedicated page which you can reach from the portfolio’s home page.
Katarina Hart presents the project called Homie in her portfolio, the design story of a location-based mobile app concept for an on-demand handyman service. On this page she goes through the project and shows her design process.
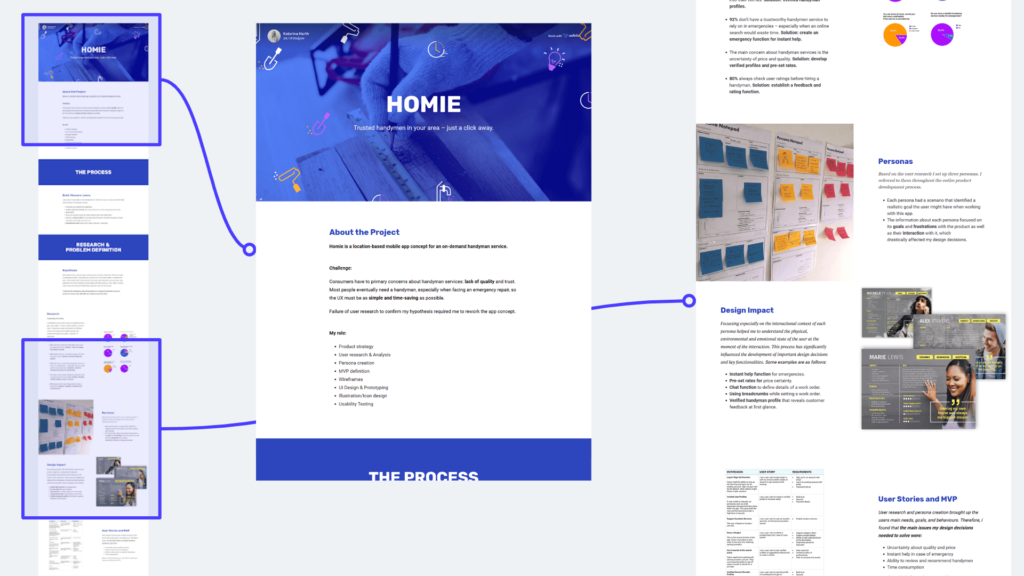
She starts with a great header image that uses the app’s brand colors and look. In the next section Katarina introduces the project. She describes the business challenge and her role.
Right after that comes info about her research. It has charts from the survey they did, a photo from the actual workshop where they created the personas, and a table of the user stories set up for the MVP.
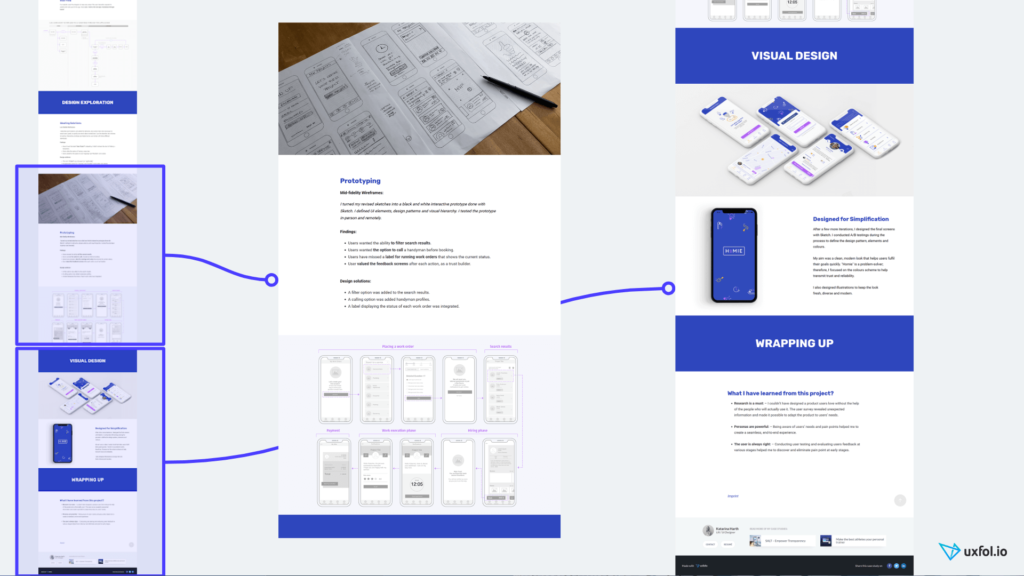
After the research findings, the project page continues with the sketches and prototypes Katarina did. She also mentions the issues she discovered while testing these early prototypes with real users and how she solved them in the next iteration. These details make the whole story real. They also show her awareness and attention to detail. The whole thing unfolds like a journey in the designer’s head, and we can read all her thoughts.
At the end comes the final design in a fancy mockup. She also lists the three most important things learned from this project.
Every hiring manager wants to see this kind of project case study. If you have something like this in your portfolio, they’ll find you irresistible. You’ll also land an interview pretty quick.
Now that we’re talking about interviews, prepare for the UX designer interview questions that you can expect there. They will also ask you to introduce your work. If you have a case study like this, just pull it out and present it. It will amaze them, I guarantee!
Mina Izadpanah made another of the awesome case studies I found. She worked as the in-house designer on a team where she had to redesign a subscription flow.
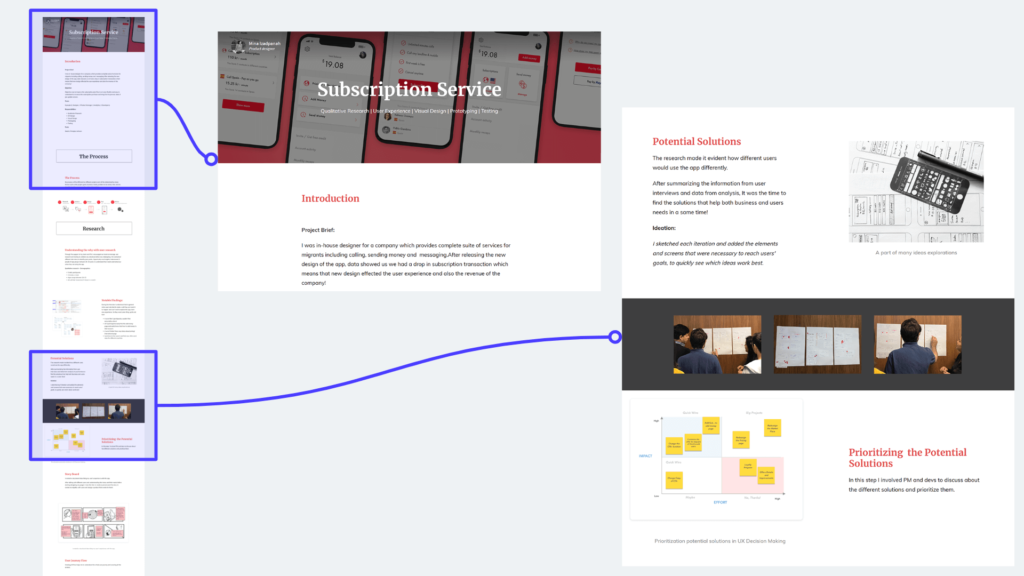
Mina also starts her case study with a nice header image that shows screens from her work.Then she describes the challenges they faced.
She and her team did user interviews to uncover the needs of the people using the service. A few sections describe the interviewing process, summing up what they found and the major decisions they made based on these insights. She even attached a few photos from the workshop where they evaluated the interview results.
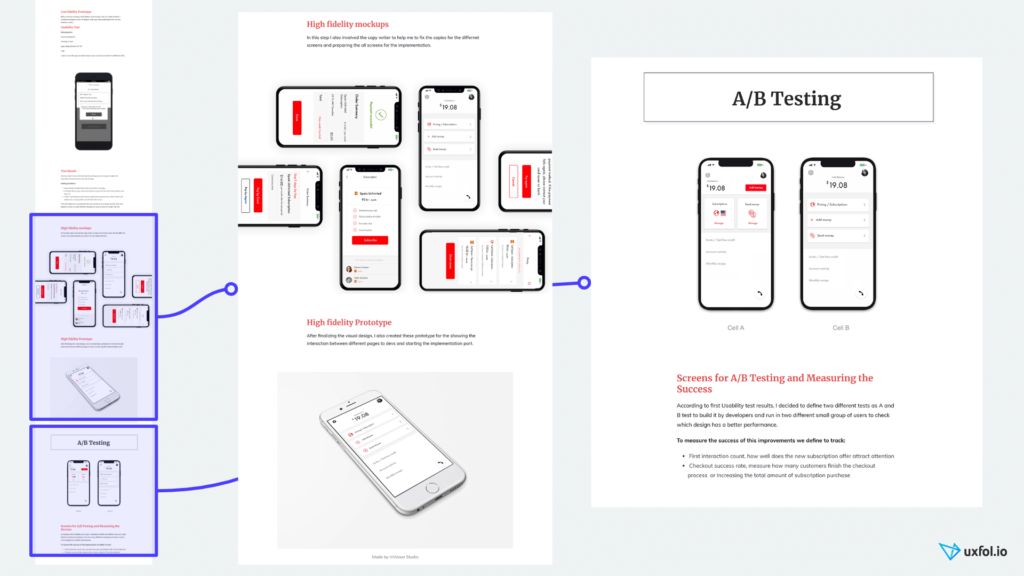
Mina displays beautiful final design screens in her portfolio. And the A/B testing section makes this case study special. There she presents the two design versions next to each other and how version A doubled the number of purchases.
All in all, it makes for a stunning case study. It proves Mina can not only draw nice screens, but that she has a solid design process and knows how to build a great and successful digital service. These skills make her much more valuable to potential employers than those who just showcase fancy illustrations.
You might think that creating case studies like these takes a lot of time. And normally I would agree with you. But as I said, I have spent the last two years with my designer friends building a tool that makes it ridiculously easy.
With it, you can do things in a few hours that would normally take one or two full weeks with a WordPress template. And now we have finally arrived at the tutorial. Let’s see how you can do it too.
Step 1: Choose your tool and sign up
When you want to build an online design portfolio, first choose your tool.
You have three options:
- Use an online portfolio creator site
- Use WordPress and build it yourself
- Use a general website building tool like Wix or Squarespace
Using WordPress with a template lays a major trap. If only I had a dollar every time I met a designer with a half-done WordPress portfolio. Don’t make that mistake. Employers actually expect your portfolio website always available online. They don’t expect you to code it yourself.
And what makes WordPress templates traps? Well, you end up spending hours finding a hosting provider, installing their program, installing plugins, editing CSS files, etc. Even if you have that pricy plugin that should have made it super simple, in reality it slows you down even more.
The solution: Use an online tool. You can spend all the time you would’ve otherwise spent with WordPress creating great content: great images about your design and great case studies. And believe me, I have never heard of anybody hired as a designer based on their WordPress skills. Most people get hired because they present great design work and great case studies.
So what online tool to use?
You could choose from general website builders like Squarespace. I consider them great and they have some nice templates. But these templates rarely look as good when you fill them in with your own content. Also, especially Squarespace’s editor interface just works too slow.
Portfolio creator sites do better. However, most of them better serve photographers or artists, not designers and definitely not digital designers.
After looking around this market a few years ago, we had these same issues. For that reason, we started building uxfol.io.
Use uxfol.io for your portfolio because it:
- Saves you a ton of time as you don’t have to deal with WordPress plugins
- Has a super-fast editor
- Has stunning templates
- Supports UX designers with many special features like built-in mockups, prototype embedding and screen galleries
- Helps you write your case studies with guiding questions and examples
- Has a great community where you can get feedback on your case study from other designers (if you are willing to write them feedback as well)
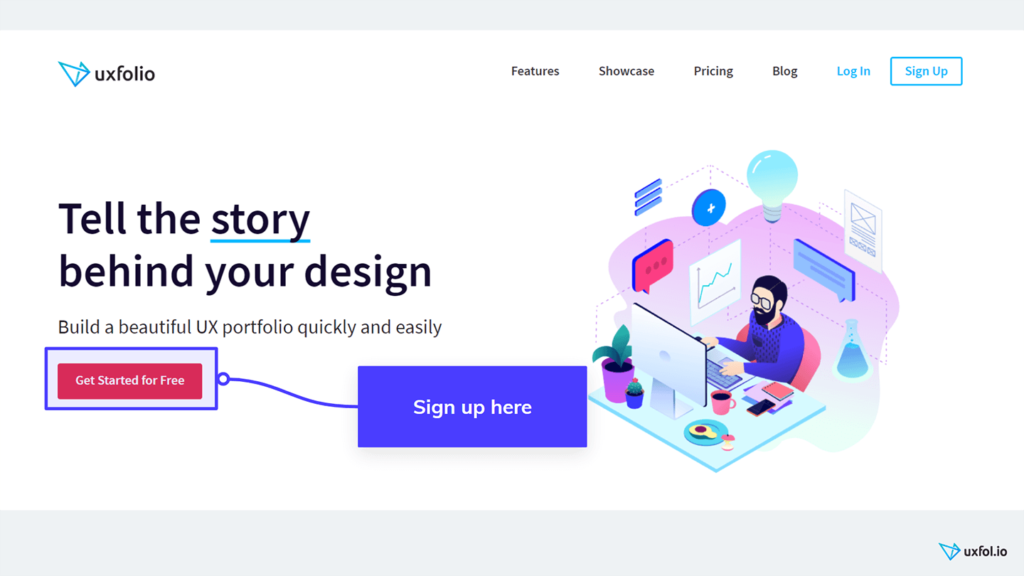
So take the first super-simple step: Open uxfol.io and sign up.
Step 2: Do some quick edits on your bio
Once you sign up, you see your fresh new portfolio immediately. It may look a bit empty right now, but we will fill it up pretty quickly. You can also change the template of your portfolio’s main page anytime in the future.
As a start, let’s add some details to the bio. Upload a profile image, but don’t worry too much about which one. In the future, you will have time to edit or replace it. Now just upload a picture of yourself that you like and move on. If the image has small background distractions, use a cleanup picture tool to make it look cleaner before you add it to your portfolio.
You can also rewrite the short bio. Finally, add social links like LinkedIn or Twitter. Once you finish these basic steps, we can move forward and start our real job – building your first project.
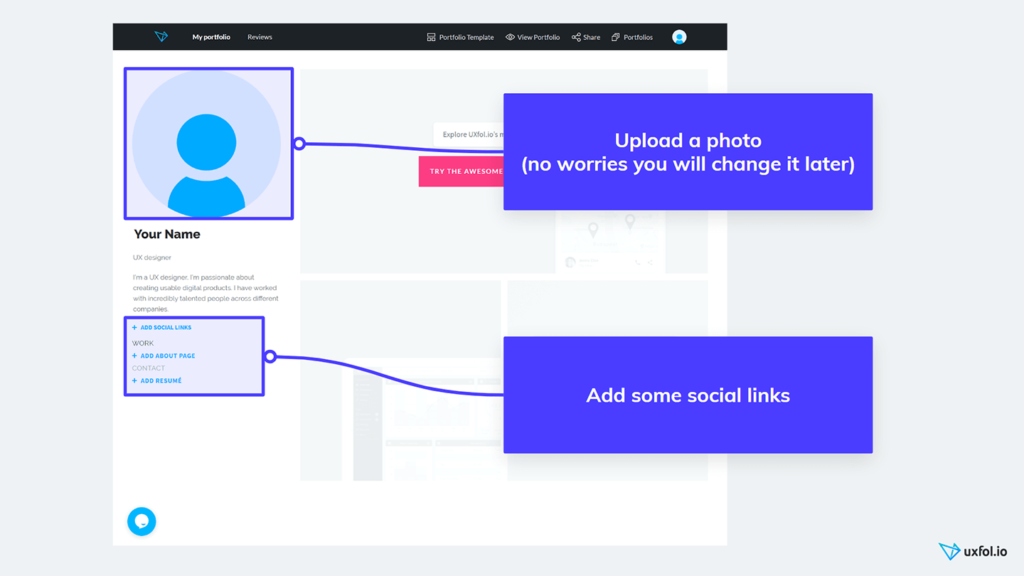
As I said before, upload a photo and do some editing here, but don’t worry too much. You can can return here later anytime you want.
Step 3: Choose your first project to showcase
Here comes the interesting part. We will add three to five projects to your online portfolio.
Why three to five? Every portfolio should have projects, but not too many. Hiring managers and HR people just don’t have time look through so much. So you need three or at most five – the best of your work.
Many designers make the mistake of uploading all their work, even ten or fifteen different design projects. These cases usually include some weaker designs because some designers wonder which one will go over best. I beg you, please don’t become that designer. Choose the best and latest design work you have.
Applicants also make the common mistake of mixing design jobs from different disciplines, like UX, print, and branding. When you apply for a job, consider the job type. For a UX job, apply with a portfolio focusing on UX work. (No, don’t add those logos or print brochures just in case. That will do more harm than good.)
Now that we have these basic rules (three to five relevant projects, only the best), you can choose the first project to upload.
At this stage, don’t try to choose all the projects you will add. Just the first one.
Keep it a very easy decision. Select the favorite thing you have worked on during the past twelve months. Or the project that fills you with the most pride.
Once you have this one project to start with, move forward. As always, you can change your mind later.
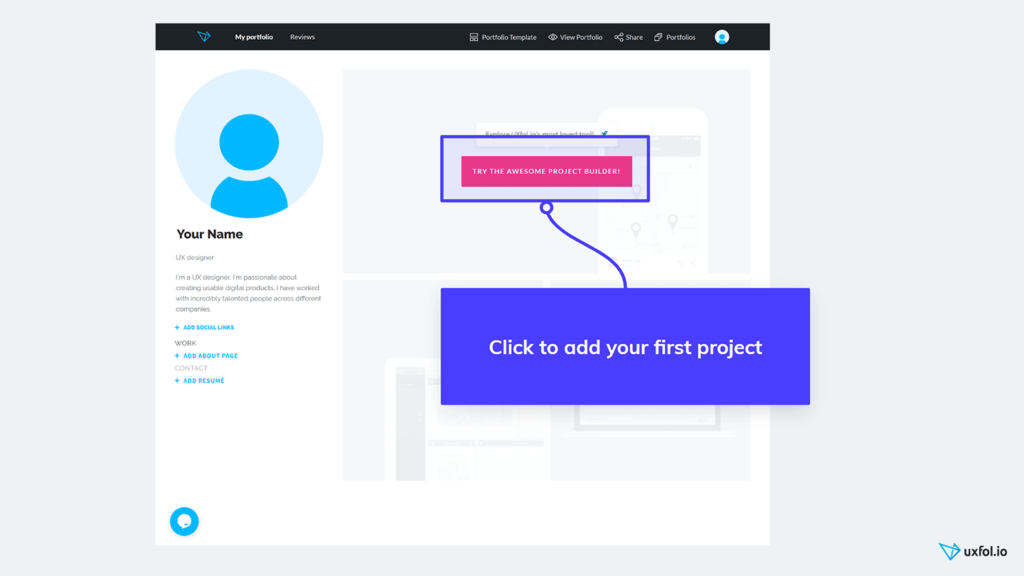
If you have that project in mind, just click on the big “Try the Awesome Project Builder!” button.
A modal will come up and here you will see the most common phases people go through in a UX project, from user interviews to prototyping and the final UI design. Check the boxes you did on the chosen project and continue. And voila, you will see your first case study.

Step 4: Add a title and a short intro to your design case study
So now you see the frame of your first project case study page. You can scroll through. In the different sections, if you look carefully you can see guiding questions in each. These will help you easily write your case study.
First give this project a title. Click on the big title text and write the name of the project. Give it a short title, like “SuperStore ecommerce redesign”. Or maybe you’d prefer something more catchy, like “Doubling the conversion rate of SuperStore”. So click on the title and rewrite it into one of your own.
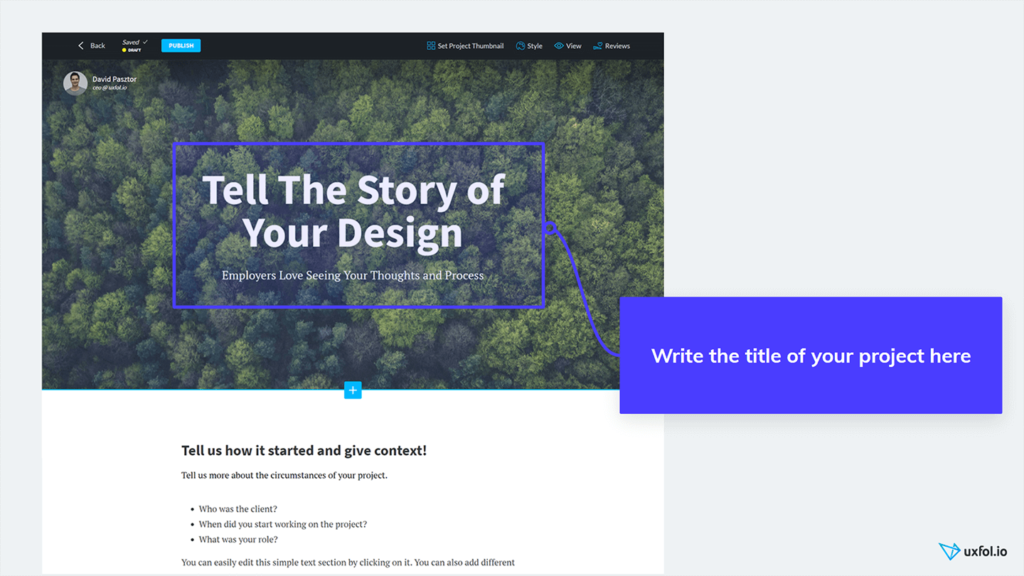
I know this background image with the forest might not fit your project perfectly (understatement), but leave it here for now. Later you’ll create your own awesome thing or find a great image for it on Unsplash.
Next, write a short intro. Don’t worry. You have me here to help to make it super easy.
Scrolling down, you will see you already have an intro there. Click on it and rewrite its text. You don’t have to make it long, just a few sentences so people understand the basics.
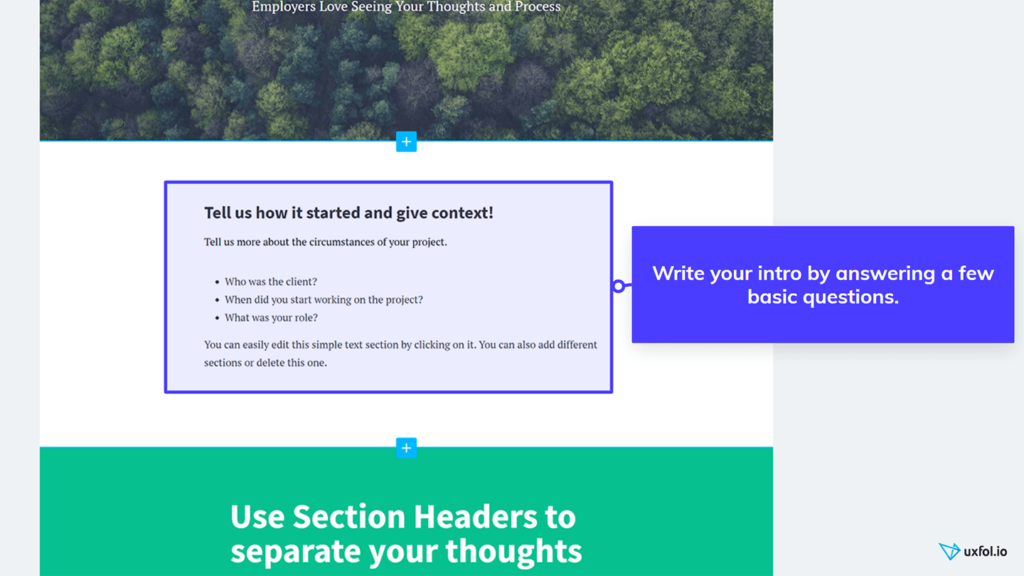
You can easily write your intro just answering the following questions:
- What did you name the product you worked on? Who did you make this product for? How do they find this product useful for them?
- What business challenge did the product team face? Why did they want to do this project in the first place? What main goal did they have?
- What role did you play in this project? Did you do it as a client project or did you serve as an internal designer? What parts did you do? Who did you have to work with?
You can give a simple title to this section as well, like “Introducing SuperProduct” or “The usability challenge SuperProduct faced”.
If you have a few sentences here, you can already move on. Time to upload your images!
Step 5: Collect and upload your images
Now collect images of your work. Dig deep into your computer’s file system, Google Drive, Zeplin, whatever, and collect all the pix you want to showcase in a single folder.
When you collect them, make sure to have some about every stage of your design process. Take some photos of your early paper sketches, whiteboard doodles or post-it walls. Also collect images of your prototypes (you can embed the whole thing as well if you want). And of course you will need some attractive shots of the final detailed design as well.
Go through and arrange them so they tell a story. This story of your design process will appear in the case study.
Let’s start with an image of the final design. You can upload it a gallery or as one big image that uses the full width of the page. If you want to explain what’s going on on that partial page, you can add an image & text section so you can write next to your image.
Once you’ve uploaded one, you can choose to display it in a mockup. Just bring your mouse over it, click on the mockup icon and choose if it should appear on a mobile tablet or desktop device.
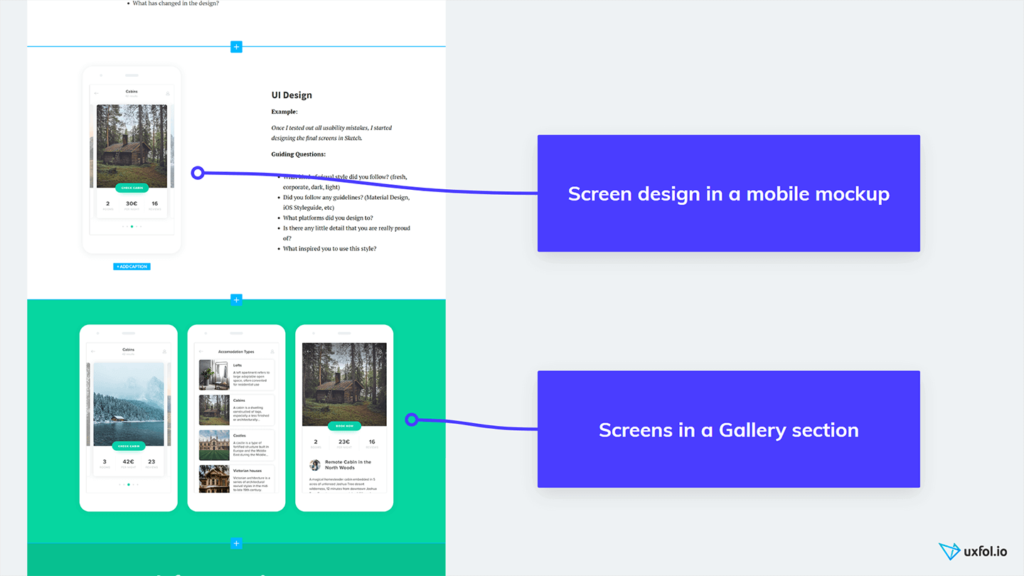
Now upload them one-by-one. Once you’ve done that, fill in the text next to them. You can get help with your copy by clicking on a text and choosing the “Text Ideas” button that appears in the bottom left corner.
Try different section types. Whenever you find some default section not useful, delete it. You can create a similar one later.
You could do some illustrations or images now. For example, if you didn’t have time to put together a proper user journey during the project, creating it now works perfectly well. It lets your future employer see what you can do.
To give you some inspiration about how to tell the story of your project, check out our Showcase page where we list some of the best work published on uxfol.io.
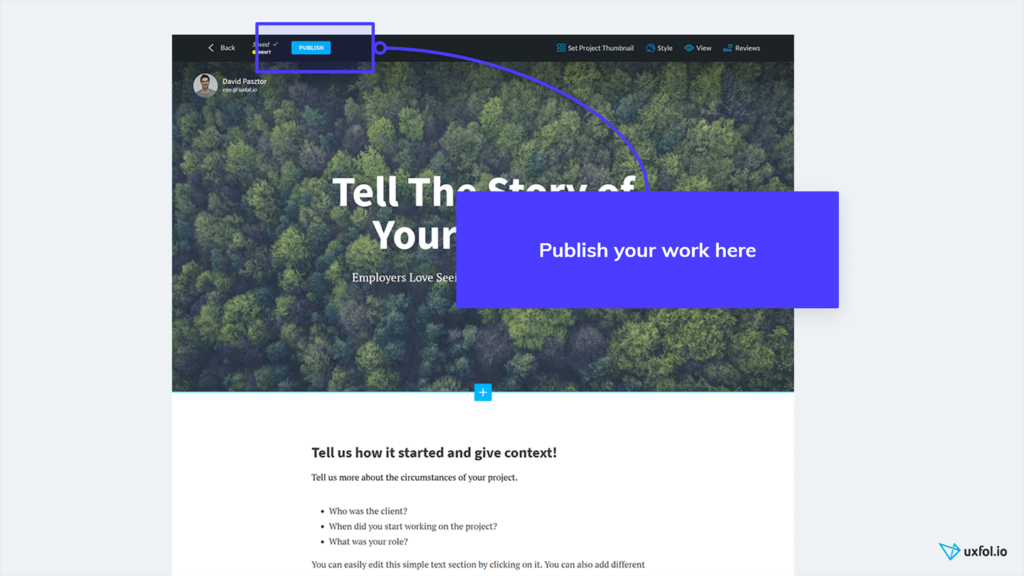
When you feel that you’ve finished your project and can now publish it, just click on the Publish button on the top of the page.
Step 6: Final touches
When you feel ready, don’t forget to scroll through your case studies and read them again to make sure that they really add up as a coherent story.
Choose a main color theme for each case study that fits that particular product’s brand. You can use this color on the big header image as a title color or a background for header sections.
If you still don’t feel confident about your work, you can ask for a review in the top right corner. Uxfol.io has a karma system: If you give a review to someone else, you will also get one.

Once you finish with your case studies, upload thumbnail images for them. They will appear on the front page of your online portfolio. We’ll generate a few for you, so you can choose from them or design some yourself and upload them.
In the settings menu, you can also create a custom URL for your portfolio, or even direct your domain name to your uxfol.io profile so it looks like your own website.
Building your portfolio with uxfol.io presents the easiest and fastest way you can choose.
Summary: How to start building your online design portfolio
I really hope you found this guide useful and could quickstart your portfolio building project.
Don’t forget: The best designers always have a design portfolio available online.
So to sum it up, follow these main steps to start building your own online design portfolio:
- Sign up for uxfol.io
- Upload a photo and add some social links
- Choose your favorite project and add it
- Build three to five case studies
- If you don’t feel sure, ask for a review
And now let’s get to work. Happy portfolio building!
You must be logged in to post a comment.